

In June I began converting my ID Buzz with the goal of making it the perfect office and camper for a digital nomad.
I learned many things along the way which I will share here, so you don't have to learn the hard way yourself.
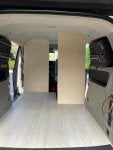
I will complete the thread in the next few days adding software modifications that were necessary, custom furniture, but in the meantime, a few pictures.
![Image]()
![Image]()
![Image]()
The final result has:
It's worth noting that differently from camperizations done by other few, this was meant with one goal: everything must be usable while inside of the vehicle, without drawers or other stuff that may require you to open the lid of the trunk or protrude from the vehicle itself
So even if it's raining or snowing outside, you have a fully functional habitat.
I tested this solution in a temperature range from-12c and +45c, and if I'm writing this post only now, it's because it is perfect for the scope i intended to achieve.
Feel free to ask questions, I will continue in the next few days.
I learned many things along the way which I will share here, so you don't have to learn the hard way yourself.
I will complete the thread in the next few days adding software modifications that were necessary, custom furniture, but in the meantime, a few pictures.
The final result has:
- always on starlink
- fridge
- induction cooking
- sink
- wc
- espresso machine
- table for two
- rotating seats
- wooden floor
- a sofa bed from Kartell which is perfect for this particular setup
- always on qualcomm computer with central control of some car features (Air conditioning for example)
It's worth noting that differently from camperizations done by other few, this was meant with one goal: everything must be usable while inside of the vehicle, without drawers or other stuff that may require you to open the lid of the trunk or protrude from the vehicle itself
So even if it's raining or snowing outside, you have a fully functional habitat.
I tested this solution in a temperature range from-12c and +45c, and if I'm writing this post only now, it's because it is perfect for the scope i intended to achieve.
Feel free to ask questions, I will continue in the next few days.
")


